Tips for Painting Pine Furniture
Painting finished pine is a great way to repurpose furniture. However, finding the right tools, paint, and process is important to ensure that it turns out great! Prepping properly is essential to achieving the best results, especially if the furniture is old or slightly worn. In this article, I’ve gathered everything you need to know about getting your pine furniture to make an exciting statement and look brand new again.
So, what is the best paint to use for pine furniture? The truth is, there is no such paint that is considered to be the “best” for pine furniture – it all comes down to the prep work. With the correct preparation, primer, a few coats of paint or varnish, and adequate drying conditions, your old pine furniture will transform into something new in no time!
When picking out a type of paint to use: oil-based, chalk type, latex, water-based, etc. you simply need to decide on what kind of appearance you’re looking for, then picking the paint becomes easier.
How Do You Paint Pine Furniture?
Before getting started, be sure to pick all the materials you may need, including sandpaper, drop cloth, scraper, primer, protective clothing and gear, brushes, and paint.
The most important thing to remember when painting or refinishing furniture is a clean base. This is often the part that takes the most work, time, and the one that people forget about or ignore.
Depending on whether your furniture piece is covered in paint or varnish, you will need to strip it of all the old. You can use the scraper to chip off old paint and use a sander to remove the layers of wax or varnish.
This process can take a significant amount of time because you want to be sure to remove as much of it as possible. Be sure to not gouge the wood during this step as stubborn paint can be difficult to get off.
Sand the Piece of Furniture
After removing the old paint and varnish, it’s time to sand and smooth. Sand off the entire piece of furniture with a low-grade grit to start, then you can move to a finer grit. When sanding, be sure to always move with the grain of the wood.
Once sanding is finished up and the furniture is nice and smooth and clean, start priming! Just as there is no specific paint to use for pine furniture, there is also no specific primer.
Use a white primer for lighter-colored paint and a dark primer for darker paint – be sure to evenly coat the furniture and apply 2-3 light coats. Allow the primer to dry fully before applying another coat.
If necessary, you may need to sand again before applying paint – sometimes the primer can feel a little coarse. Be sure to go over everything with a clean cloth to remove dust before moving on to paint.
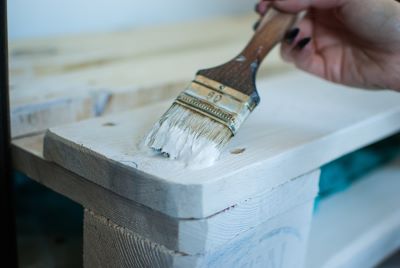
When painting, be sure to go over the furniture with smooth strokes that follow the natural lines of the piece. Apply 2-3 coats, allowing for complete dry-time between layers and you’re done!
Do I Need to Seal My Pine Furniture After Painting?
The trick to making a good paint job last is to seal. Using polyacrylic is the best way to preserve the color of your furniture and it can also give it a nice sheen. Some oil-based polyacrylic can start to yellow over time so you may not want to use it over certain colors.
Be sure to apply a couple of coats of the polyacrylic, sand with a low-grade sandpaper grit in between each coat, and wipe off the dust before applying another coat. After the primer, paint, and seal your furniture should be good as new and ready to take up a prominent spot in your home!
Is Pine Furniture Hard to Paint?
Wood furniture, whether made of pine or not, can be a little more involved than painting other materials. You don’t want the piece to look streaky, be uneven, crack, or feel rough. This is why the sanding and priming steps of the process are so important.
Painting pine furniture can be slightly more difficult to work with because it often has several wood knots that will soak in primer and paint.
While some people may think it’s the paint choice that impacts the look of the furniture, in reality, it is the preparation work that is put in before the paint even goes on. Proper prep and tools make the painting process much easier.
When you choose to repurpose an old piece of furniture, be sure to take into account the amount of time and work you will need to put in – especially if you have a specific vision in mind.
Many painting projects will take at least a week to two weeks to do properly. Don’t let the word scare you away from your project, you can easily get the job done as long as you give yourself time.
How to Pick the Right Paint
There is no right or wrong paint to choose for your pine furniture, however, each paint type will have a different appearance and need a different amount of prep. When you choose a water-based, acrylic, or chalk paint – primer is not essential, but you will likely need to apply more coats of paint.
Latex, oil-based, and enamel paints do require a primer, as well as at least 3 coats of paint. With advances in paint technology in the last few years, you can now choose a paint that also includes a primer – taking 2 steps, down to one! One downside to this is that it can be slightly more expensive than purchasing a separate primer and paint.
If you can’t decide on the kind of paint you want, go to your nearest home and garden store and ask the professionals in the paint area. They can help point you in the right direction and pick out the tools that will work best for your project.
Keep in mind that even though you are saving money by doing the painting project on your own, it may not be as cheap as you are expecting. If this is your first project, you will need to invest in the tools, paint, and materials that can add up – especially depending on the size of your furniture piece.
Tips for Painting Wood Furniture
Everyone loves a good how-to guide with tips and tricks of the trade. Here are a few tips to keep in mind when starting your wood furniture painting project:
- paint from the top-down: you can eliminate large paint drips as you work downward on your furniture
- The primer must match the type of paint: wood furniture does best with a satin or semigloss finish that matches the paint finish
- Don’t leave primer unpainted
- Oil-based primers are best for stain blocking but have a strong odor so be sure to paint in a room with good ventilation
- You may need to fill in cracks in the wood with wood putty – it helps to make the surface even and allow the paint to settle flat on the surface of the wood
Adding Fun Accents to Wood Furniture
A trend that has been blowing up in recent years is “wood-aging” or “antiquing”. And guess what? It’s pretty easy to do yourself! While it may be easier to go pick out an antique piece of furniture that gives you the same effect, it can often be expensive.
But, when you choose to paint your furniture, you can add an antiqued look by adding a dark glaze to the surface and wiping it away to leave an aged line in the wood.
Renew an old piece of furniture by picking out fun knobs. It’s amazing what small details can do to change the overall look of a piece of furniture. Adding wallpaper to the sides and insides of drawers for a fun peek-a-boo moment is easy to do as well!
There are endless possibilities to revamping your old furniture on a budget, all you have to do is get a little creative.
Consult Your Nearest Paint Professional
Embarking on a new project can be fun, but also a bit nerve-racking. Meeting your expectations can be hard when trying something new, so be sure to reach out to a professional about any questions you have.
Whether you go to your nearest paint store, or a home and garden store, they can help walk you through the process, pick out the tools you’ll need, and provide you with advice on colors, types of paint, numbers of coats needed, and so much more.


